Share
Pin
Tweet
Send
Share
Send
For self-made booklets we take:
• 20 * 20 cm two binding sheets of cardboard;
• Two pinkish cloths, we take a good cotton in a white bow, and the second with beautiful pink flowers;
• Sintepon;
• Two leaves of pink scrapbook paper 30 * 30 cm;
• Printed pages for photos and for places with wishes, we take 20 pieces, so that in the end we get 20 stitched leaflets;
• A pair of metal rings with diameters of 35 mm;
• Four metal corners;
• Four pink eyelets and they need an installer;
• Pink delicate lace;
• Two photographs printed on whatman paper, as well as a personal inscription;
• Hole puncher;
• Double-sided tape;
• Light pink and pink ribbons with chiffon roses;
• Light pink ribbon with pompons;
• Light pink satin ribbon 25 mm wide;
• Suspension metal crown;
• Pink metal brads;
• Pink napkin cut down;
• Pink hydrangea flowers;
• Glue stick;
• Water-based glue;
• Scissors, ruler, eraser, simple pencil.
![](http://img.uaft2404.org/img/sdela-2019/detskaya-kniga-pozhelanij-dlya-devochki.jpg)
![](http://img.uaft2404.org/img/sdela-2019/detskaya-kniga-pozhelanij-dlya-devochki-2.jpg)
To begin with, we will paste strips of double-sided tape on cardboard blanks in order to stick a synthetic winterizer.
![](http://img.uaft2404.org/img/sdela-2019/detskaya-kniga-pozhelanij-dlya-devochki-3.jpg)
![](http://img.uaft2404.org/img/sdela-2019/detskaya-kniga-pozhelanij-dlya-devochki-4.jpg)
Glue the synthetic winterizer squares and get soft basics. Now we need to cut a piece of fabric and lace for each blank to wrap the cover with fabric.
![](http://img.uaft2404.org/img/sdela-2019/detskaya-kniga-pozhelanij-dlya-devochki-5.jpg)
![](http://img.uaft2404.org/img/sdela-2019/detskaya-kniga-pozhelanij-dlya-devochki-6.jpg)
Cut off, tried on, be sure to make 2 cm of supply on all sides. We cut off all the pages at the edges so that equal squares of 19.5 * 19.5 cm are obtained. We take one page with a ruler, and one page with a frame and glue them together with a strip of double-sided tape.
![](http://img.uaft2404.org/img/sdela-2019/detskaya-kniga-pozhelanij-dlya-devochki-7.jpg)
![](http://img.uaft2404.org/img/sdela-2019/detskaya-kniga-pozhelanij-dlya-devochki-8.jpg)
We sew all the sheets together in pairs.
![](http://img.uaft2404.org/img/sdela-2019/detskaya-kniga-pozhelanij-dlya-devochki-9.jpg)
![](http://img.uaft2404.org/img/sdela-2019/detskaya-kniga-pozhelanij-dlya-devochki-10.jpg)
We smooth pieces of fabric with an iron, then we sew them in pairs and sew lace at the junction. Now glue the solid blanks to the fabric using a glue stick. We start gluing from the corners.
![](http://img.uaft2404.org/img/sdela-2019/detskaya-kniga-pozhelanij-dlya-devochki-11.jpg)
![](http://img.uaft2404.org/img/sdela-2019/detskaya-kniga-pozhelanij-dlya-devochki-12.jpg)
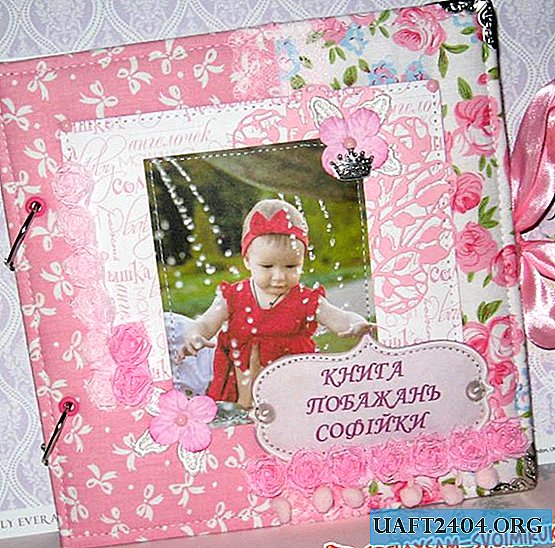
In the center, on both blanks, glue on a strip of tape. Now we need to try on the design of the front side of the book. First, cut a piece of paper, then a napkin with flowers, on top of the photo and the inscription.
![](http://img.uaft2404.org/img/sdela-2019/detskaya-kniga-pozhelanij-dlya-devochki-13.jpg)
![](http://img.uaft2404.org/img/sdela-2019/detskaya-kniga-pozhelanij-dlya-devochki-14.jpg)
Paper sizes and photos in the following sizes.
![](http://img.uaft2404.org/img/sdela-2019/detskaya-kniga-pozhelanij-dlya-devochki-15.jpg)
![](http://img.uaft2404.org/img/sdela-2019/detskaya-kniga-pozhelanij-dlya-devochki-16.jpg)
Inside for the cover we need two squares 19.5 * 19.5 cm. We sew the cover design, as well as both parts of the cover around the edges.
![](http://img.uaft2404.org/img/sdela-2019/detskaya-kniga-pozhelanij-dlya-devochki-17.jpg)
![](http://img.uaft2404.org/img/sdela-2019/detskaya-kniga-pozhelanij-dlya-devochki-18.jpg)
Glue the squares of scrapbook paper inside the covers and put it under something heavy for a while.
![](http://img.uaft2404.org/img/sdela-2019/detskaya-kniga-pozhelanij-dlya-devochki-19.jpg)
![](http://img.uaft2404.org/img/sdela-2019/detskaya-kniga-pozhelanij-dlya-devochki-20.jpg)
Now we make two holes on the cover, put the grommets, at the same distance we fix the grommets on the other.
![](http://img.uaft2404.org/img/sdela-2019/detskaya-kniga-pozhelanij-dlya-devochki-21.jpg)
![](http://img.uaft2404.org/img/sdela-2019/detskaya-kniga-pozhelanij-dlya-devochki-22.jpg)
Dress the corners on the cover.
![](http://img.uaft2404.org/img/sdela-2019/detskaya-kniga-pozhelanij-dlya-devochki-23.jpg)
![](http://img.uaft2404.org/img/sdela-2019/detskaya-kniga-pozhelanij-dlya-devochki-24.jpg)
Now we make holes on all pages. You can also add an envelope for the curl.
![](http://img.uaft2404.org/img/sdela-2019/detskaya-kniga-pozhelanij-dlya-devochki-25.jpg)
![](http://img.uaft2404.org/img/sdela-2019/detskaya-kniga-pozhelanij-dlya-devochki-26.jpg)
We collect a book on the rings. Glue some decorations now and you're done.
![](http://img.uaft2404.org/img/sdela-2019/detskaya-kniga-pozhelanij-dlya-devochki-27.jpg)
![](http://img.uaft2404.org/img/sdela-2019/detskaya-kniga-pozhelanij-dlya-devochki-28.jpg)
Thank you for your attention and all great success!
![](http://img.uaft2404.org/img/sdela-2019/detskaya-kniga-pozhelanij-dlya-devochki-29.jpg)
![](http://img.uaft2404.org/img/sdela-2019/detskaya-kniga-pozhelanij-dlya-devochki-30.jpg)
![](http://img.uaft2404.org/img/sdela-2019/detskaya-kniga-pozhelanij-dlya-devochki-31.jpg)
Share
Pin
Tweet
Send
Share
Send